When we are building multiple module projects managing dependencies is a headache.Maven have dependency management mechanism it will help us to download all required dependencies.
Example
we want to add Oracle JDBC driver to our project, In traditional way we want to follow these steps
- download oracle jdbc driver
- copy .jar to class path
- include jar to project
note:-in traditional way for jar updates we want to download and add new one
Maven we don't want to care about these things.. We just want to declare reference to oracle jdbc in pom.xml
<dependencies>

  <!-- ORACLE database driver -->
  <dependency>
   <groupId>com.oracle</groupId>
   <artifactId>ojdbc6</artifactId>
   <version>11.2.0</version>
  </dependency>

 </dependencies>
Now we are going to discus about how convert a project that created in maven to eclipse project.maven have a modular architecture along with a lot of plugins ,Eclipse is one of the most famous IDE that also have modular architecture it have a lot of plugins .
Maven have a Eclipse plugin and Eclipse have a Maven plugin we are going to discus those things.when we using maven with those command line stuffs and etc when we are going through eclipse we don't want to that command line codes it have very much helpful, Maven and eclipse giving good integration ,they will work very well together thanks for that plugins .
Step 1. go to maven project . Here my project is FirstApp ,there you can see one pom.xml file ,now what we want is generate one eclipse project using that pom.xml
Step 2. Use mvn eclipse:eclipse command
Note:- If you are running this first time it may take some downloads all require for resolving dependencies to convert project to eclipse project .
Step 3:- verify the project
after execution of this command we notices two new files created
Maven have a Eclipse plugin and Eclipse have a Maven plugin we are going to discus those things.when we using maven with those command line stuffs and etc when we are going through eclipse we don't want to that command line codes it have very much helpful, Maven and eclipse giving good integration ,they will work very well together thanks for that plugins .
1. Eclipse plugin for Maven
Step 1. go to maven project . Here my project is FirstApp ,there you can see one pom.xml file ,now what we want is generate one eclipse project using that pom.xml
Step 2. Use mvn eclipse:eclipse command
Note:- If you are running this first time it may take some downloads all require for resolving dependencies to convert project to eclipse project .
Step 3:- verify the project
after execution of this command we notices two new files created
Note:- these both file are created for eclipse ,when you open those files you notice a "M2_REPO" class variable is generated ,you want to add that class path in eclipse otherwise eclipse will show a error
Step 4:- Importing eclipse project
File->Import->Eeneral->Existing Projects in Workspace->Select root directory ->Done
Now your maven project is create for eclipse ,Write your comments :)
Hai friends this code just a simple modification from our old post Php to java :)
" .Our new java code is simple code for loading gmail messages using IMAP. Here using java imap extension to use inbox. Before you proceding this project make sure about your imap setting in Gmail.
" .Our new java code is simple code for loading gmail messages using IMAP. Here using java imap extension to use inbox. Before you proceding this project make sure about your imap setting in Gmail.
import javax.mail.Folder;
import javax.mail.Message;
import javax.mail.MessagingException;
import javax.mail.NoSuchProviderException;
import javax.mail.Session;
import javax.mail.Store;
import javax.mail.Message;
import javax.mail.MessagingException;
import javax.mail.NoSuchProviderException;
import javax.mail.Session;
import javax.mail.Store;
public class InboxReader {
public static void main(String args[]) {
Properties props = System.getProperties();
props.setProperty("mail.store.protocol", "imaps");
try {
Session session = Session.getDefaultInstance(props, null);
Store store = session.getStore("imaps");
store.connect("imap.gmail.com", "<username>", "password");
System.out.println(store);
Properties props = System.getProperties();
props.setProperty("mail.store.protocol", "imaps");
try {
Session session = Session.getDefaultInstance(props, null);
Store store = session.getStore("imaps");
store.connect("imap.gmail.com", "<username>", "password");
System.out.println(store);
Folder inbox = store.getFolder("Inbox");
inbox.open(Folder.READ_ONLY);
Message messages[] = inbox.getMessages();
for(Message message:messages) {
System.out.println(message);
}
} catch (NoSuchProviderException e) {
e.printStackTrace();
System.exit(1);
} catch (MessagingException e) {
e.printStackTrace();
System.exit(2);
}
inbox.open(Folder.READ_ONLY);
Message messages[] = inbox.getMessages();
for(Message message:messages) {
System.out.println(message);
}
} catch (NoSuchProviderException e) {
e.printStackTrace();
System.exit(1);
} catch (MessagingException e) {
e.printStackTrace();
System.exit(2);
}
}
1. Mtop
2. Innotop
Innotop can be really handy when you need a quick and easy tool that can provide a lot of details on what MySQL is doing – without using difficult queries to get those details manually. For our Percona Support customers, using Innotop will often be much easier then running complex SHOW statements and filtering their output in order to get some simple facts like slave replication lag, number of busy threads or InnoDB history list length. Also for us, Support engineers, it’s sometimes quicker to get a fast system overview with Innotop before we do deeper investigation using SHOW statements, Information_schema or more complex ways.
PHPUnit
PHPUnit is the de-facto standard for unit testing in PHP projects. It provides both a framework that makes the writing of tests easy as well as the functionality to easily run the tests and analyse their results.vfsStream
vfsStream is a stream wrapper for a virtual file system that may be helpful in unit tests to mock the real file system.PHP_Depend
pdepend can generate a large set of software metrics from a given code base. These values can be used to measure the quality of a software project and they help to identify the parts of an application where a code refactoring should be applied.PHP Mess Detector
phpmd scans PHP source code and looks for potential problems such as possible bugs, dead code, suboptimal code, and overcomplicated expressionsPHP_CodeSniffer
phpcs tokenises PHP, JavaScript and CSS files and detects violations of a defined set of coding standards. It is an essential development tool that ensures your code remains clean and consistent. It can also help prevent some common semantic errors made by developers.PHP Copy/Paste Detector
phpcpd is a Copy/Paste Detector (CPD) for PHP code. It scans a PHP project for duplicated code.PHP Dead Code Detector
phpdcd is a Dead Code Detector (DCD) for PHP code. It scans a PHP project for code that is no longer used.phpDox
phpDox is the documentation generator for PHP projects. This includes, but is not limited to, API documentation.Jenkins PHP
The goal of the Template for Jenkins Jobs for PHP Projects is to provide a standard template for Jenkins (the leading open-source continuous integration server) jobs for PHP projects.
Node Js gives ability for JavaScript to write back end code .It is one of the perfect technologies for real time application .Now we discussing how to write a simple chat server ad client using node js .
Steps
 |
| Download code |
Steps
- Install and setup node js
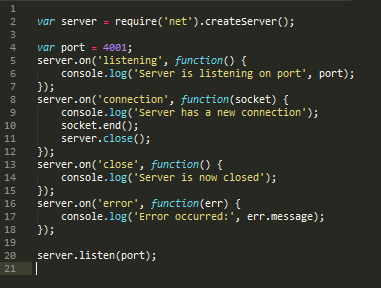
- Create a TCP server
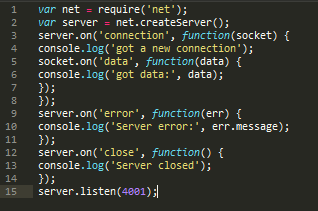
- Create a TCP client
Install and setup node
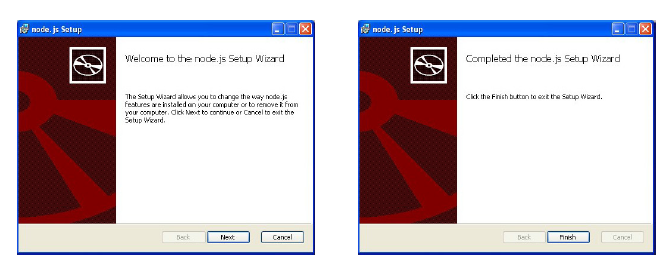
First step on node is how to setup a node.js platform ,now i am only discussing on windows .node supports windows OS since 0.6 version ,for installing go to node.js website and from download tab download http://nodejs.org/download/ windows .msi installer .After down loading run the installer and click next and install node ,it will show a conform message after it install properly
now you installed node properly now we want to know node is working properly or note
go to cmd and type node -v
Create TCP server
Node has a first-class HTTP server implementation in the form of a pseudo-class in http .Server, which descends from the TCP server pseudo-class in net.Server. This means that everything described in this chapter applies to the Node HTTP server as well.
now these things are working proper you finished how to set up a simple TCP server using node and how to connect that TCP port using telnet
Building a simple tcp server have flowing steps
1.Create a tcp server
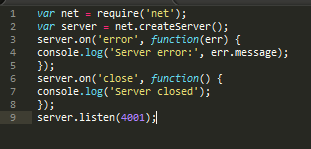
2.Accept connection
3 Receiving client data
4.Collecting all clients
5. Broadcasting
These are the steps for creating tcp chat server . in this project i am attaching a full set of working TCP server and TCP client with this post .
- Create a tcp server
- Accept connection
- Receiving client data
- Collecting all the clients
- Broadcasting data
1.Create a tcp server

2.Accept connection
3 Receiving client data
4.Collecting all clients
5. Broadcasting
These are the steps for creating tcp chat server . in this project i am attaching a full set of working TCP server and TCP client with this post .
 |
| Download code |
Hello friends now we are going to
discus a small code for creating Zip file using PHP. Creating zip
file is simple as comparing with author languages.
PHP have a very useful class called
ZipArchive ,To create multiple zip files in this post i will show you
how create a ZIP file
1
2
3
4
5
6
7
8
9
10
11
12
13
14
15
16
17
18
19
20
21
22
23
| <?phpfunction zipFilesDownload($file_names, $archive_file_name, $file_path)$file_path = dirname(__FILE__) . '/';zipFilesDownload($fileNames, $zip_file_name, $file_path);?> |
Hello friends now we are going to discuss on Zend framework,
it also known as zf. This is a A to Z step by step articles on zend .this is
first one so here cover on the following three basics.
- 1. What is a frame work and why they need?
- 2. Installing zend framework.
- 3. First zend program.
What is a frame work and why they
need?
Zend Framework (ZF) is
a framework for PHP 5 and it is based on object-oriented paradigm. It is an open-source
framework under the BSD License. The idea of ZF was conceptualized
in the early 2005, and it was publicly announced in October 2005 at the first
Zend Conference.
Like other PHP stack zend provides a PHP stack called zend server
and also zend provides a IDE for ZF.
Requirements:
To run Zend 1.7.0 we need PHP 5.2.4 or latter .ZF‘s programmer’s reference
says strictly 5.2.3 due to some security reasons, for unit testing it need PHP
Unit 3.0 or latter
Zend framework of PHP is basically works on MVC architecture MVC
stands for Model View and Controller.
· Model : The
model part deals with the part which is concerned with the specification of the
data to be displayed Business logic part of the program is handled by
this part which involves activities like load and save to databases
·
View: Responsibility
of this part is to display the content of the application to the user. Usually
this section contains the HTML part
·
Controller: This
part combines together the specifics of model and view section and gives the
assurance of displaying correct data
Installing zend framework. (with
xampp )
Now we are going to install ZF framework on our local computer,
initially we need to download the zend frame work from http://framework.zend.com/download.
Unzip the folder into host c:\xampp\htdocs
Now you want to go command prompt (WIN key + R=Run,
Window=> type cmd and press enter key). Type zf show version and press
enter, it should display like this.
If it works your path variables are working perfect. After
that we need create a directory stretcher that helps to reduce our work load
and improve readability.
.
go to C:\xampp\htdocs\myfirstproject\application\views\scripts\index
folder and in the index.phtml and change the existing code
with the following:
Now type http://localhost/myfirstproject/public/ in the
address bar of the browser and press return key, the output in the browser
should be like this:
<?php
echo "<center><b>Hello World</b></center>";
?>
save it and reload page output will as follows
In the next applications we will learn a how connect DB using Zend. plz read some other articles and give some reviews about my personal programming blog.
JDBC Connection
Hello friends now we
are going to discuss about Java Data Base Connectivity. We heard connecting
Java and DB are so difficult, etc. and blab bla bla …… :) We are going to show
you much easy it is. Only want to follow some regular steps.
JDBC is application
programing interface .that allow programmers to access Data Base Systems from
java code .it allows to execute SQL queries on java program.it helps
programmers to connect, send receive data from DB.
JDBC uses application
programing technology for driver manager and Data Base specific drivers, for
providing transparency and concurrency to heterogeneous Data Bases. Creating
JDBC programs understanding its architecture make easier.
JDBC have layered Architecture.
It is a class of java.sql package that controls a set of JDBC drivers. Each driver has to be register with this class.
This method establishes a connection to specified database url. It takes three string types of arguments like:
This method is used for disconnecting the connection. It frees all the resources occupied by the database.
SOURCE CODE.
JDBC have layered Architecture.
When using JDBC we can follow following steps.
1. Loading
JDBC driver.
2. Establishing
connection.
3. Executing
SQL statements.
4. Getting
result.
5. Closing
connection.
There is an interface
in java.sql package that specifies connection with specific
database called connection
Connection conn = null;
DriverManager:
It is a class of java.sql package that controls a set of JDBC drivers. Each driver has to be register with this class.
getConnection(String url, String
userName, String password):
This method establishes a connection to specified database url. It takes three string types of arguments like:
url: -
Database url where stored or created your database
userName: - User name of MySQL
password: -Password of MySQL
userName: - User name of MySQL
password: -Password of MySQL
con.close():
This method is used for disconnecting the connection. It frees all the resources occupied by the database.
import java.sql.*; |
Password strength meter
Here we indrodusing a simple password strength meter,it measure of the effectiveness of a password in resisting guessing and brute-force attacks. In
its usual form, it estimates how many trials an attacker who does not have
direct access to the password would need, on average, to guess it correctly.
The strength of a password is a function of length, complexity, and
unpredictability
HTML Code
<form name=df style='margin:0px;'><p class="border">Enter Password .<input type=password length=20 name='pwd' style="text-decoration:none;color: #dddd;"onkeyup='CheckPasswordStrength(this.value);'></p><div id='pwd_strength'></div></br></form>
JavaScript Code
<script type="text/javascript">

var pass_strength;

function IsEnoughLength(str,length)
{
 if ((str == null) || isNaN(length))
  return false;
 else if (str.length < length)
  return false;
 return true;

}

function HasMixedCase(passwd)
{
 if(passwd.match(/([a-z].*[A-Z])|([A-Z].*[a-z])/))
  return true;
 else
  return false;
}

function HasNumeral(passwd)
{
 if(passwd.match(/[0-9]/))
  return true;
 else
  return false;
}

function HasSpecialChars(passwd)
{
 if(passwd.match(/.[!,@,#,$,%,^,&,*,?,_,~]/))
  return true;
 else
  return false;
}


function CheckPasswordStrength(pwd)
{
 if (IsEnoughLength(pwd,14) && HasMixedCase(pwd) && HasNumeral(pwd) && HasSpecialChars(pwd))
  pass_strength = "<b><font style='color:olive'>Very strong</font></b>";
 else if (IsEnoughLength(pwd,8) && HasMixedCase(pwd) && (HasNumeral(pwd) || HasSpecialChars(pwd)))
  pass_strength = "<b><font style='color:Blue'>Strong</font></b>";
 else if (IsEnoughLength(pwd,8) && HasNumeral(pwd))
  pass_strength = "<b><font style='color:Green'>Good</font></b>";
 else
  pass_strength = "<b><font style='color:red'>Weak</font></b>";

 document.getElementById('pwd_strength').innerHTML = pass_strength;
}
function ctck()
{
     var sds = document.getElementById("dum");
     if(sds == null){
        alert("You are using a free package.\n You are not allowed to remove the tag.\n");
     }
     var sdss = document.getElementById("dumdiv");
     if(sdss == null){
         alert("You are using a free package.\n You are not allowed to remove the tag.\n");
     }
}
document.onload ="ctck()";
</script>
Don't Forget To Comment ...!
scriptime.blogspot.in
JavaScript
Embedding YouTube videos from links
Embedding video to a webpage make
a real change in the early day’s web. It
can make a multimedia interaction with web user and author .so feel of
that website become more realistic .most of users have broadband connection so
they are flexible with video contents .one of the most common used method is
using a flash player and flv videos those hosted in an external server
,like YouTube .
Embedding
YouTube
Code
function linkToYoutube(link, ops) {
var o = $.extend({ width: 480, height: 320, params: '' }, ops); var id = /\?v\=(\w+)/.exec(link)[1]; return '<iframe style="display: block;"'+ ' class="youtube-video" type="text/html"'+ ' width="' + o.width + '" height="' + o.height + ' "src="http://www.youtube.com/embed/' + id + '?' + o.params + '&wmode=transparent" frameborder="0" />'; } $('a').each(function(){ var link = $(this).attr('href'); $(this).html( linkToYoutube(link, { params: 'theme=light' }) ); })
Download & Live Code Edit
Password Hashes in PHP
Hello friends now we are discussing about some simple
security tricks in php, mainly on handling passwords using php. This section
explains why password hashing and how can we use hashing.
Why
Every god programmer’s know storing password in form of
clear text is bad method of programing .this make user and programmer at risk. This
is the main reason why password hashing is used .password hashing are working
on the basics of cryptography.
“In cryptography, a cryptographic hash function is a
transformation that takes an input and returns
a fixed-size string, which is called the hash value.”
By applying hashing algorithm’s they make user’s password’s strong.it
make difficult to Attackers. PHP offers so simple inbuilt methods to create hashes,
such as md5 (), sh1 (), ssha () etc.
How hashing in PHP
There are different algorithm’s for creating a hash of a
test most popular are md5() and sha()now we disusing about those two first.
             <?php
                $str = "Hello";
                echo md5($str);
             ?>
The output of the code above will be:
8b1a9953c4611296a827abf8c47804d7
             <?php
                $str = 'Hello';
                 echo sha1($str);
              ?>
The output of the code above will be:
f7ff9e8b7bb2e09b70935a5d785e0cc5d9d0abf0
In the above example md5 can create a 128 bit of hash from
given text, and second one is sha1. It can make 160 bit hash from given password
text. But md5 and sha algorithms can decrypt easly with help of rainbow tables.so
we need to use next level algorithms.


.jpg)
